Introduction
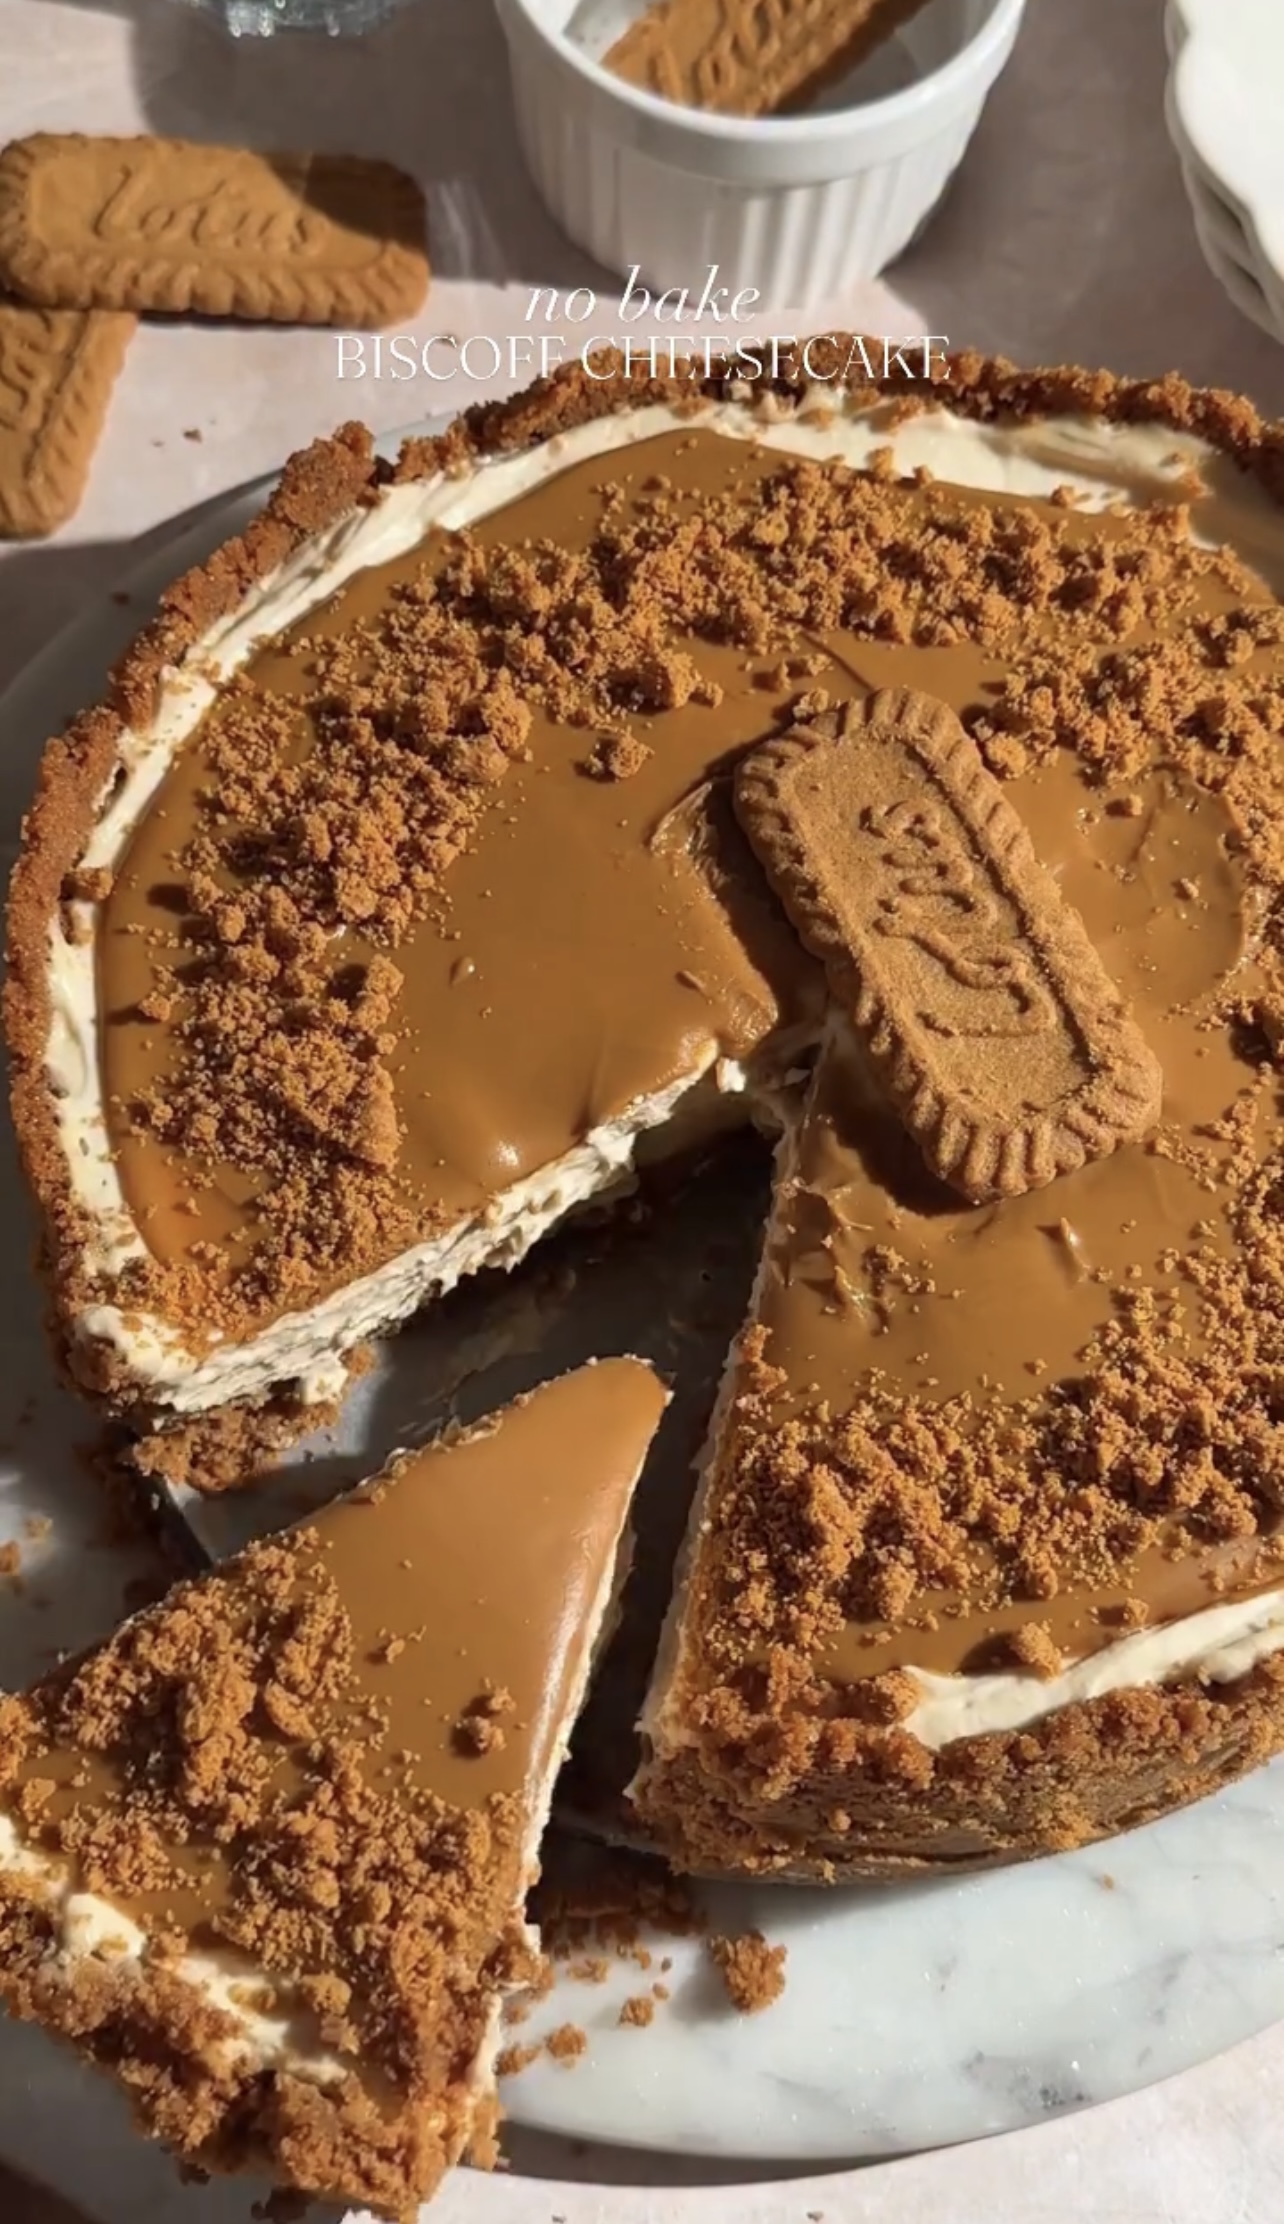
If you love the irresistible flavor of caramelized cookies, this No-Bake Biscoff Cheesecake is a dessert you need to try. Made with a buttery Biscoff biscuit crust, a smooth cookie butter cheesecake filling, and a glossy Biscoff topping, this creamy dessert delivers incredible flavor without turning on the oven.
Every slice combines the crunchy texture of spiced caramel cookies with a rich, velvety filling made from cream cheese, Lotus Biscoff spread, and whipped cream. The result is a luxurious cheesecake that looks beautiful on a dessert table and tastes like something you’d order at a bakery.
📋 Recipe Overview
| Recipe Detail | Information |
| Recipe Name | No-Bake Biscoff Cheesecake |
| Prep Time | 20–25 minutes |
| Cook Time | None |
| Chill Time | At least 6 hours |
| Total Time | Approximately 6 hours 25 minutes |
| Servings | 10–12 slices |
| Course | Dessert |
| Cuisine | European-inspired |
| Difficulty | Easy |
| Main Ingredients | Biscoff biscuits, cream cheese, cookie butter, and heavy cream |
| Flavor | Caramelized, buttery, creamy, and lightly spiced |
| Texture | Crunchy crust with a smooth, fluffy filling |
| Best Occasion | Birthdays, holidays, parties, and family gatherings |
❤️ Why You’ll Love This Recipe
1. No Baking Required
This cheesecake is perfect when you want a homemade dessert without the extra work of baking a traditional cheesecake.
2. Rich Cookie Butter Flavor
Biscoff spread gives the filling a distinctive caramelized biscuit flavor with warm, lightly spiced notes.
3. A Buttery Biscuit Crust
Crushed Biscoff cookies and melted butter create a delicious base that complements the creamy filling.
4. Smooth and Fluffy Filling
Cream cheese provides richness, while whipped cream adds a lighter texture that makes each bite melt in your mouth.
5. Beautiful Bakery-Style Presentation
The glossy cookie butter topping, crushed biscuit border, and whole cookies create an elegant finish with very little decorating effort.
6. Perfect for Making Ahead
The cheesecake needs several hours to chill, making it an excellent dessert to prepare the day before a celebration.
7. Easy to Customize
You can add chocolate, caramel, espresso, or extra crushed biscuits to create your own variation.
🛒 Ingredients
1. Biscoff Cookie Crust
| Ingredient | Quantity |
| Lotus Biscoff biscuits | 250 g (approximately 30 cookies) |
| Unsalted butter, melted | 75 g (5 tablespoons) |
Tip: Crush the biscuits into fine, even crumbs so the melted butter can coat them properly. This helps create a firm crust that holds together when sliced.
2. Creamy Biscoff Cheesecake Filling
| Ingredient | Quantity |
| Full-fat cream cheese, softened | 400 g (14 oz) |
| Smooth Lotus Biscoff spread | 200 g (approximately ¾ cup) |
| Powdered sugar | 60 g (approximately ½ cup) |
| Vanilla extract | 1 teaspoon |
| Heavy whipping cream, cold | 300 ml (1¼ cups) |
Ingredient tip: Use full-fat block-style cream cheese for a rich, stable filling. Reduced-fat cream cheese or cream cheese from a tub may produce a softer result.
3. Biscoff Topping and Garnish
| Ingredient | Quantity |
| Lotus Biscoff spread | 150 g (approximately ½ cup) |
| Extra Biscoff biscuits, crushed | 4–5 biscuits |
| Whole Biscoff biscuits | 4–6, for decoration |
The melted cookie butter creates a glossy topping, while the crushed biscuits add texture and make the cheesecake look especially inviting.
👩🍳 Step-by-Step Instructions
Step 1: Prepare the Biscoff Crust
- Place the Biscoff biscuits in a food processor.
- Pulse until they form fine, even crumbs.
- If you don’t have a food processor, place the biscuits in a sealed food bag and crush them with a rolling pin.
- Transfer the crumbs to a mixing bowl.
- Pour in the melted butter.
- Stir until all the crumbs are evenly coated and resemble damp sand.
- Line the bottom of an 8-inch or 9-inch springform pan with parchment paper.
- Transfer the mixture to the pan.
- Press the crumbs firmly into an even layer using the bottom of a glass or measuring cup.
- Refrigerate for at least 20–30 minutes while preparing the filling.
For a neat presentation, press the crumbs slightly up the sides of the pan if you prefer a raised crust.
Important: Compact the crumbs firmly. A loose crust may crumble when you remove the cheesecake from the pan.
Step 2: Beat the Cream Cheese
- Place the softened cream cheese in a large mixing bowl.
- Beat with an electric mixer on medium speed for approximately 2 minutes.
- Scrape down the sides of the bowl.
- Continue mixing until the cream cheese is completely smooth.
Room-temperature cream cheese blends more easily and helps prevent lumps in the filling.
Step 3: Add the Biscoff Spread
- Add 200 g of smooth Biscoff spread to the cream cheese.
- Beat on medium-low speed until fully combined.
- Scrape the sides and bottom of the bowl to ensure the mixture is evenly blended.
- Add the vanilla extract and powdered sugar.
- Mix again until smooth and creamy.
The filling should have a uniform caramel-colored appearance without visible streaks of cream cheese.
Taste the mixture before adding any extra sugar, as Biscoff spread already contains plenty of sweetness.
Step 4: Whip the Heavy Cream
- Pour the cold heavy whipping cream into a separate, clean mixing bowl.
- Using an electric mixer, beat on medium-high speed until medium-stiff peaks form.
- Stop when the cream holds its shape but still looks smooth.
Cold cream whips more effectively than warm cream. For even better results, chill the bowl and beaters for 10–15 minutes before whipping.
Avoid overwhipping, as the cream can become grainy.
Step 5: Fold the Whipped Cream into the Filling
- Add approximately one-third of the whipped cream to the Biscoff cream cheese mixture.
- Gently fold it in with a silicone spatula to loosen the filling.
- Add the remaining whipped cream in two additions.
- Fold carefully until no obvious white streaks remain.
- Avoid vigorous stirring, which can deflate the whipped cream.
The finished filling should be thick, smooth, and fluffy enough to spread over the crust.
Helpful tip: Folding rather than beating helps preserve the air in the whipped cream, giving the cheesecake a lighter texture.
Step 6: Fill the Cheesecake Pan
- Remove the chilled crust from the refrigerator.
- Spoon the cheesecake filling onto the crust.
- Spread the filling evenly with an offset spatula.
- Smooth the top, paying attention to the edges.
- Gently tap the pan on the counter once or twice to release large air pockets.
If you want a professional finish, make the top as level as possible before chilling.
Step 7: Chill Until Firm
- Cover the pan loosely with plastic wrap or foil.
- Refrigerate for at least 6 hours.
- For the best texture and easiest slicing, chill overnight.
The filling needs sufficient time to firm up. Cutting it too early can cause the slices to collapse or lose their shape.
If your refrigerator is particularly full or warm, allow additional chilling time.
Step 8: Prepare the Glossy Biscoff Topping
- Place 150 g of Biscoff spread in a microwave-safe bowl.
- Microwave in 10–15-second intervals, stirring between each interval.
- Stop when the spread becomes smooth and pourable.
- Allow it to cool for a few minutes so it is warm rather than hot.
You can also warm the spread gently in a heatproof bowl over a pan of warm water.
Avoid overheating it, as very hot spread can soften the cheesecake filling.
Step 9: Add the Topping
- Remove the cheesecake from the refrigerator after it has set.
- Pour the slightly cooled Biscoff spread over the surface.
- Tilt the pan gently to help the topping spread evenly.
- Use an offset spatula to guide it toward the edges.
- Sprinkle crushed Biscoff biscuits around the border or over the top.
- Arrange whole biscuits on the cheesecake if desired.
- Return the cheesecake to the refrigerator for approximately 20–30 minutes to help the topping firm.
For the cleanest presentation, make sure the topping is not hot when it touches the chilled filling.
Step 10: Release, Slice, and Serve
- Run a thin knife around the inside edge of the springform pan.
- Carefully release the springform ring.
- Transfer the cheesecake to a serving plate if desired.
- Use a sharp knife dipped in hot water and wiped dry to cut the cheesecake.
- Clean the knife between slices for neat edges.
- Serve chilled.
Each slice should reveal a compact biscuit crust, a thick creamy filling, and a glossy cookie butter topping.
⭐ Best Tips for the Perfect No-Bake Biscoff Cheesecake
Use Full-Fat Cream Cheese
Full-fat cream cheese creates a richer filling and generally provides a firmer texture than reduced-fat alternatives.
Make Sure the Cream Cheese Is Softened
Cold cream cheese can form lumps that are difficult to smooth out. Let it sit at room temperature until soft but not warm.
Keep the Whipping Cream Cold
Cold heavy cream whips more reliably and helps create a stable filling.
Don’t Overmix the Filling
Beat the cream cheese mixture until smooth, then fold in the whipped cream gently. Excessive mixing can reduce the airy texture.
Press the Crust Firmly
A tightly packed crust is less likely to crumble when you remove the cheesecake from the pan.
Allow Enough Chilling Time
Six hours is the minimum recommended chilling time, but overnight refrigeration usually produces cleaner slices.
Let the Topping Cool Slightly
Warm Biscoff spread should be pourable, not hot. Excess heat can soften the cheesecake surface.
Use a Springform Pan
An 8-inch springform pan creates a taller cheesecake, while a 9-inch pan produces a slightly wider, thinner result.
Slice with a Warm Knife
Dip the knife in hot water, dry it, and cut straight down through the cheesecake. Wipe the blade between slices.
🍪 Best Ingredient Options
Biscoff Biscuits
| Alternative | Result |
| Lotus Biscoff biscuits | Classic caramelized biscuit flavor |
| Speculoos biscuits | Similar spiced, caramelized flavor |
| Graham crackers | Milder, less spiced crust |
| Digestive biscuits | Buttery, lightly sweet crust |
| Chocolate sandwich cookies | Rich chocolate contrast |
If you substitute another cookie, the crust’s sweetness and texture may change. Add the melted butter gradually and stop when the crumbs hold together when pressed.
Biscoff Spread
Smooth Biscoff spread creates a uniform filling and glossy topping. Crunchy cookie butter can be used for additional texture, although it will produce a less smooth finish.
Heavy Whipping Cream
Use cream with enough fat to whip into stable peaks. In many regions, double cream works well, although its higher fat content can produce a denser result.
Do not substitute ordinary milk for the whipping cream, because milk cannot be whipped into the same stable structure.
Cream Cheese
Full-fat cream cheese is the best choice for this recipe. If using a softer spreadable product, expect the cheesecake to be less firm.
🔄 Recipe Variations
1. Chocolate Biscoff Cheesecake
Add a thin layer of melted chocolate over the crust before adding the filling, or drizzle melted dark chocolate over the finished cheesecake.
The slight bitterness of dark chocolate balances the sweetness of the cookie butter.
2. Biscoff Cheesecake with a Chocolate Crust
Replace the Biscoff biscuit crust with crushed chocolate wafer cookies.
Chocolate and caramelized biscuit flavors work beautifully together.
3. Salted Caramel Biscoff Cheesecake
Drizzle a small amount of salted caramel sauce over the Biscoff topping before chilling.
Finish with a light sprinkle of flaky sea salt immediately before serving.
4. Crunchy Biscoff Cheesecake
Use crunchy cookie butter in the filling and add extra crushed biscuits between the crust and filling.
This version offers more texture in every bite.
5. Biscoff White Chocolate Cheesecake
Fold a small amount of cooled, melted white chocolate into the cream cheese mixture before folding in the whipped cream.
Because white chocolate adds sweetness and firms as it cools, the texture will differ slightly. Avoid adding it while hot.
6. Mini Biscoff Cheesecake Cups
Divide the crust mixture among 10–12 small dessert glasses or cups.
Add the cheesecake filling, smooth the tops, and refrigerate until firm. Finish each portion with melted Biscoff spread and crushed cookies.
Individual portions are especially convenient for parties and buffets.
7. Biscoff Cheesecake with Bananas
Arrange a thin layer of banana slices over the crust before adding the filling.
Use firm, ripe bananas and serve the cheesecake within a couple of days, as cut bananas can brown over time.
8. Coffee Biscoff Cheesecake
Add 1–2 teaspoons of cooled espresso or strong coffee to the cream cheese mixture.
Start with a small amount to avoid making the filling too loose. The coffee flavor pairs especially well with the caramelized biscuit spread.
🍓 What to Serve With Biscoff Cheesecake
This cheesecake is rich and sweet, so simple accompaniments work best.
| Serving Option | Why It Works |
| Fresh strawberries | Add freshness and a fruity contrast |
| Raspberries | Provide a tart contrast to the sweet filling |
| Sliced bananas | Complement the caramelized biscuit flavor |
| Fresh berries | Add color to the dessert plate |
| Hot coffee | Balances the richness of the cheesecake |
| Espresso | Pairs beautifully with the caramel notes |
| Black tea | Offers a simple, less-sweet accompaniment |
| Vanilla ice cream | Creates an extra-indulgent dessert |
| Dark chocolate shavings | Add a slightly bitter chocolate note |
Serving suggestion: Serve a chilled slice with fresh strawberries and a cup of coffee for an elegant afternoon treat.
⏰ Make-Ahead Instructions
This no-bake cheesecake is an excellent make-ahead dessert.
Prepare It the Day Before
- Make the crust and press it into the pan.
- Prepare the filling and spread it over the crust.
- Cover and refrigerate overnight.
- Add the melted Biscoff topping and garnishes before serving.
- Allow the topping to set in the refrigerator for another 20–30 minutes.
Preparing the filling in advance gives the cheesecake plenty of time to firm up.
Prepare the Entire Cheesecake Ahead
You can assemble the cheesecake, add the topping, and refrigerate it overnight.
For the best appearance, add the crushed biscuits and whole-cookie decorations shortly before serving so they remain as crisp as possible.
For Parties
Keep the cheesecake refrigerated until serving time. If transporting it, use an insulated cooler with ice packs and keep it level to protect the topping.
Because this dessert contains dairy, it should not remain at room temperature for extended periods.
🧊 Storage Instructions
Refrigerator
Store the cheesecake in an airtight container or cover the springform pan carefully.
Refrigerate at 40°F (4°C) or below and enjoy within 3–4 days for the best quality.
The crushed biscuit garnish may soften as it absorbs moisture, but the cheesecake should remain creamy.
Individual Slices
Place slices in an airtight container in a single layer when possible.
If stacking is necessary, separate the slices with parchment paper to protect the topping.
Room Temperature
Do not leave the cheesecake at room temperature for more than 2 hours, or more than 1 hour when the temperature is above 90°F (32°C).
Return leftovers to the refrigerator promptly.
❄️ Can You Freeze No-Bake Biscoff Cheesecake?
Yes. This cheesecake can be frozen, although the whipped cream filling may change texture slightly after thawing.
How to Freeze
- Chill the cheesecake until firm.
- Freeze it uncovered for approximately 1 hour to firm up the surface.
- Wrap the cheesecake or individual slices tightly.
- Place them in a freezer-safe airtight container.
- Label with the date.
For the best quality, use within 1–2 months.
How to Thaw
Transfer the cheesecake to the refrigerator and thaw overnight.
Keep it refrigerated until ready to serve.
Should You Freeze the Whole Cheesecake or Individual Slices?
Both options work. Individual slices are convenient when you want to thaw only the portions you need.
If presentation is important, add fresh crushed biscuits after thawing because the original garnish may soften in the freezer.
⚠️ Common Mistakes to Avoid
1. Using Too Much Butter in the Crust
Problem: The crust becomes greasy or overly hard.
Solution: Measure the butter carefully and mix until the crumbs resemble damp sand.
2. Using Cold Cream Cheese
Problem: The filling develops lumps.
Solution: Soften the cream cheese before mixing it with the cookie butter.
3. Overwhipping the Cream
Problem: The filling becomes grainy or difficult to fold.
Solution: Stop whipping when the cream holds medium-stiff peaks.
4. Beating the Whipped Cream Too Vigorously into the Filling
Problem: The filling loses air and becomes denser.
Solution: Fold the whipped cream in gently using a silicone spatula.
5. Not Chilling Long Enough
Problem: The cheesecake collapses or produces messy slices.
Solution: Refrigerate for at least 6 hours, preferably overnight.
6. Pouring Hot Biscoff Spread over the Filling
Problem: The topping softens the surface of the cheesecake.
Solution: Warm the spread only until pourable, then let it cool slightly before spreading.
7. Removing the Cheesecake Too Early
Problem: The sides may slump when the springform ring is removed.
Solution: Make sure the filling is firm before releasing the pan.
8. Cutting with a Cold, Sticky Knife
Problem: The knife drags the topping and creates uneven slices.
Solution: Use a warm, clean, dry knife and wipe it between cuts.
📊 Nutrition Estimate
The following values are approximate estimates per slice, assuming the cheesecake is cut into 12 portions. Actual values vary according to the brands and quantities used.
| Nutrient | Estimated Amount Per Slice |
| Calories | 430–520 kcal |
| Protein | 5–7 g |
| Total Fat | 32–40 g |
| Saturated Fat | 17–23 g |
| Carbohydrates | 30–42 g |
| Sugars | 22–32 g |
| Fiber | 1–2 g |
| Sodium | 250–400 mg |
These figures are estimates rather than laboratory-tested measurements. Larger slices will contain more calories and other nutrients.
❓ Frequently Asked Questions
Does No-Bake Biscoff Cheesecake Need Gelatin?
No. This recipe relies on full-fat cream cheese, whipped cream, and sufficient refrigeration to set.
It should become firm enough to slice when properly prepared and chilled, although it will generally be softer than a baked cheesecake or a version made with gelatin.
How Long Does Biscoff Cheesecake Need to Chill?
Chill it for at least 6 hours. Overnight refrigeration is best if you want a firm filling and neat slices.
Can I Make This Cheesecake Without a Springform Pan?
Yes. You can assemble it in a deep pie dish or an 8 × 8-inch dish.
If using a regular dish, serve the cheesecake directly from the dish because removing individual slices may be more difficult.
Can I Use Crunchy Biscoff Spread?
Yes. Crunchy cookie butter adds small biscuit pieces to the filling.
For the smoothest texture, use smooth spread in the topping.
Why Is My No-Bake Cheesecake Too Soft?
Possible reasons include using low-fat or very soft cream cheese, underwhipping the cream, or not chilling the cheesecake long enough.
Make sure the cream is whipped to medium-stiff peaks and allow the cheesecake to chill overnight if needed.
Can I Make This Recipe a Day Ahead?
Absolutely. Prepare the cheesecake the day before serving and keep it covered in the refrigerator.
Add the decorative biscuits shortly before serving for the best texture.
Can I Use Digestive Biscuits Instead of Biscoff Cookies?
Yes. Digestive biscuits make a delicious crust, although the cheesecake will have a milder flavor.
If you still want the signature Biscoff taste, keep the cookie butter in the filling and topping.
Can I Use Whipping Cream Instead of Double Cream?
Yes, provided the whipping cream has enough fat to whip into stable peaks. The exact texture may vary by brand.
Avoid using ordinary pouring cream that cannot hold whipped peaks.
Can I Freeze the Cheesecake?
Yes. Freeze it whole or in individual slices, wrapped tightly and stored in an airtight container.
For the best quality, use within 1–2 months and thaw overnight in the refrigerator.
How Do I Get Clean Cheesecake Slices?
Chill the cheesecake thoroughly before cutting.
Use a sharp knife dipped in hot water, wipe it dry, and clean the blade between slices.
Is Biscoff Spread the Same as Cookie Butter?
Biscoff spread is a type of cookie butter made from caramelized biscuits. Other cookie butter products can also work in this recipe, although the flavor and consistency may vary.
Can I Make Mini Biscoff Cheesecakes?
Yes. Divide the crust and filling among small glasses, jars, or dessert cups.
Refrigerate until set, then add the melted cookie butter topping and crushed biscuits.
🍰 Final Thoughts
This No-Bake Biscoff Cheesecake is a dream dessert for anyone who loves creamy cheesecake and the distinctive flavor of caramelized biscuits.
With its buttery cookie crust, fluffy cookie butter filling, and glossy Biscoff topping, every slice feels indulgent without requiring complicated baking techniques. It’s easy enough for a weekend treat yet impressive enough for birthdays, holidays, and special gatherings.
For the best results, use full-fat cream cheese, whip the cream until it holds its shape, and give the cheesecake plenty of time to chill. Finish with crushed Biscoff biscuits and a few whole cookies for a beautiful presentation.
Make it ahead, keep it chilled, and enjoy a rich, creamy Biscoff dessert that’s sure to become a favorite!