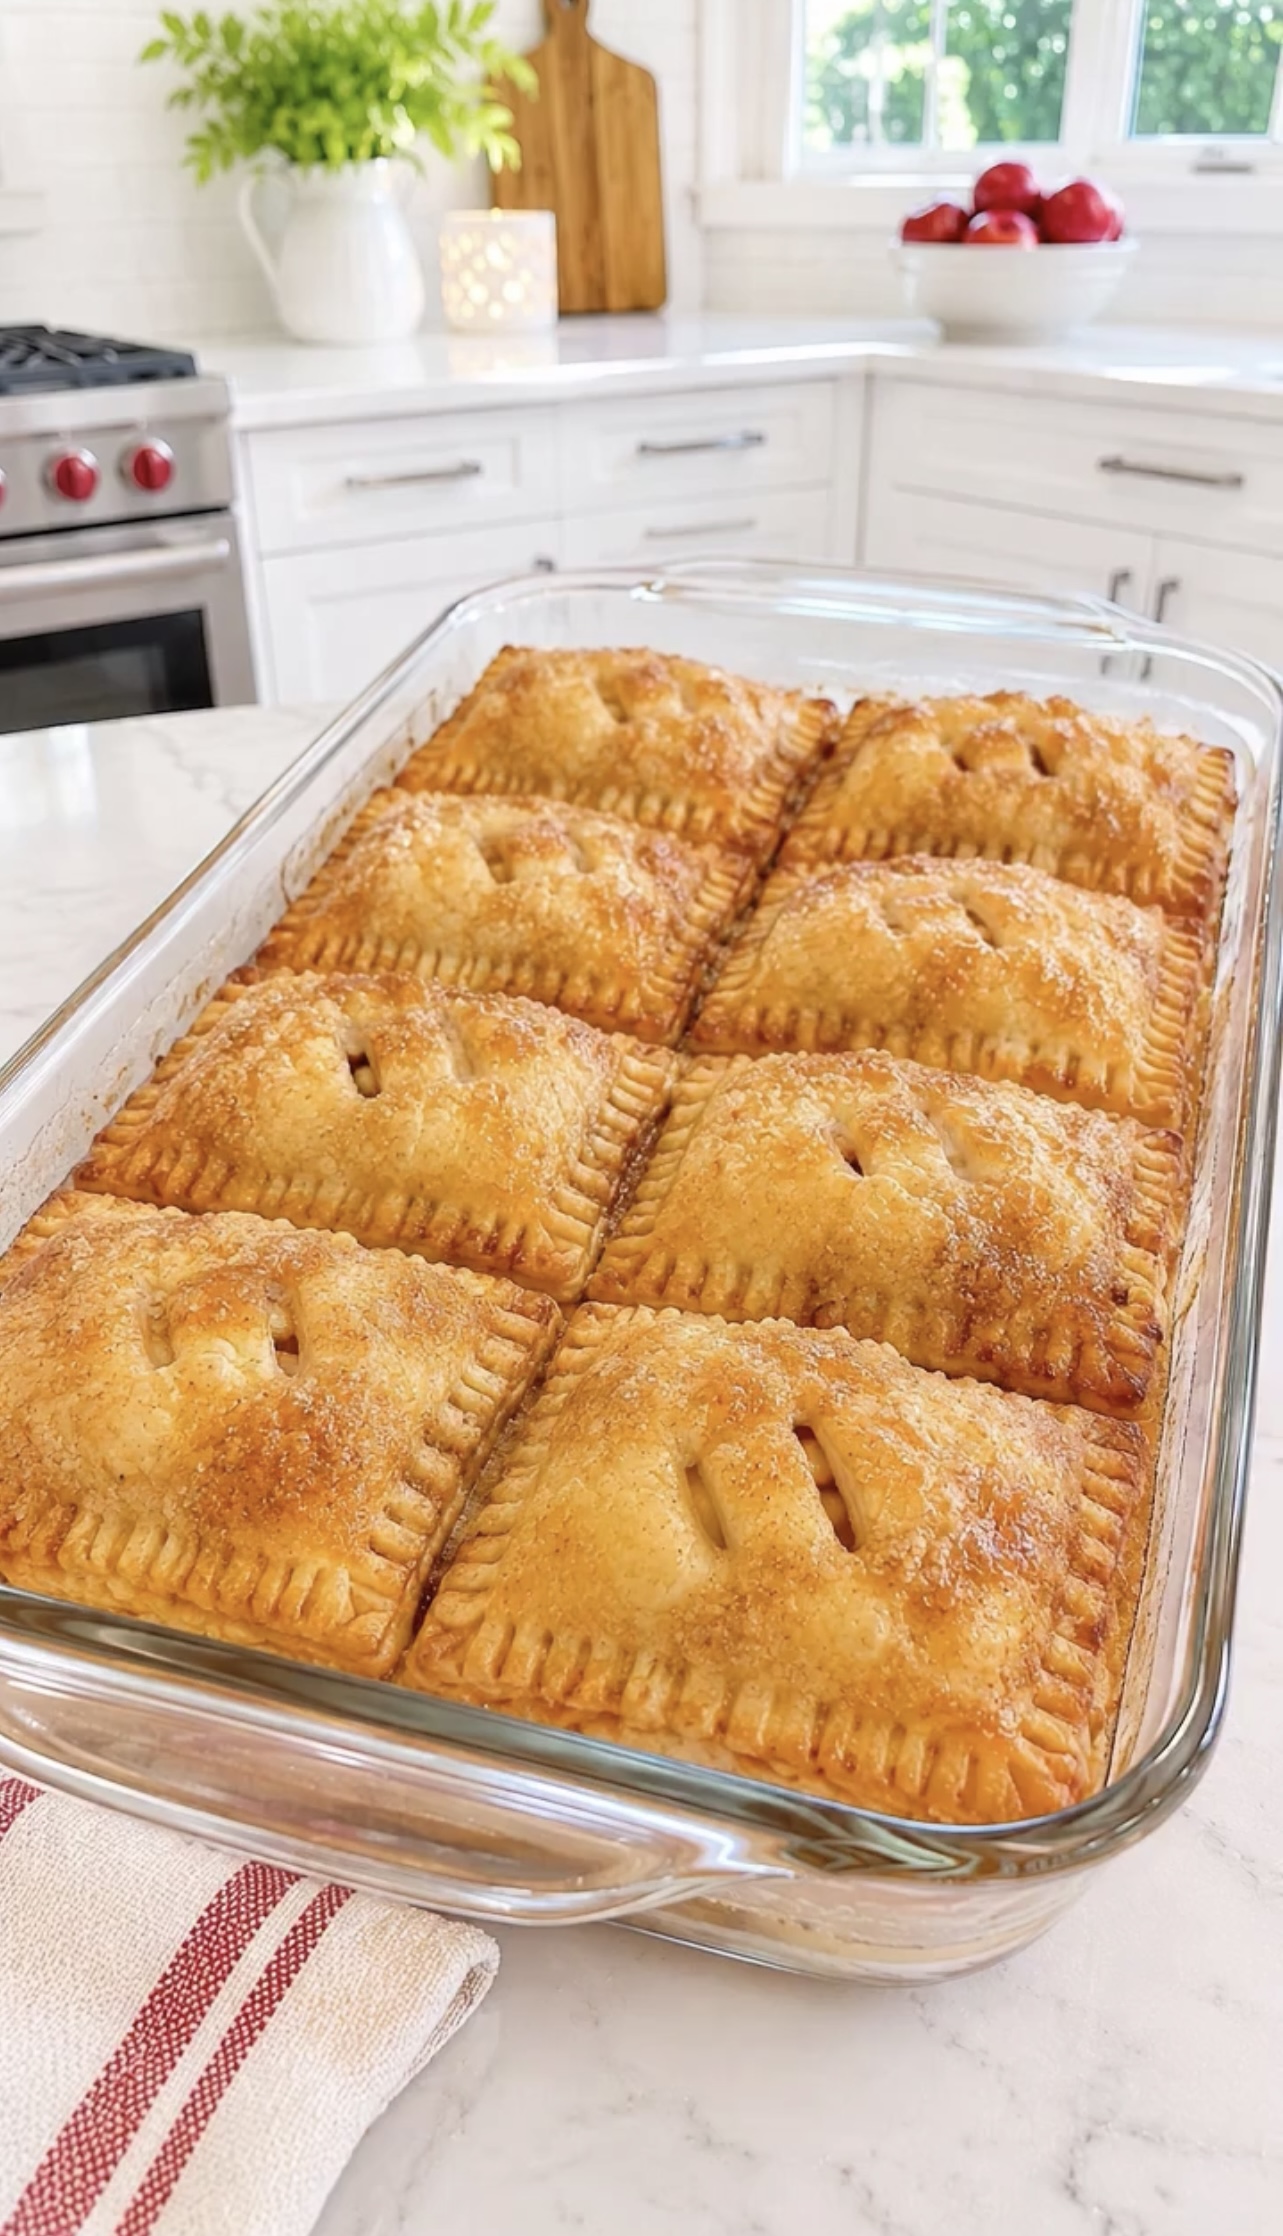
These Easy Homemade Apple Pie Pockets are a delicious twist on classic apple pie, featuring golden, flaky pastry filled with tender cinnamon-spiced apples. Each pastry is individually folded, sealed with a fork, and baked until beautifully golden brown with a lightly crisp, sugary top.
Perfect for fall baking, holiday desserts, family gatherings, or a cozy weekend treat, these homemade apple turnovers bring all the comforting flavors of traditional apple pie into convenient individual portions. Serve them warm with vanilla ice cream, whipped cream, or a drizzle of caramel sauce for an irresistible dessert.
🍽️ Recipe Overview
| Detail | Information |
| Prep Time | 25 minutes |
| Cook Time | 25–30 minutes |
| Total Time | 55 minutes |
| Servings | 8 pastries |
| Baking Temperature | 375°F (190°C) |
| Difficulty | Easy |
| Dessert Type | Baked Pastries |
| Main Flavor | Apple, Cinnamon, and Butter |
❤️ Why You’ll Love This Recipe
- Flaky and Buttery: The pastry becomes beautifully golden and crisp around the edges.
- Classic Apple Pie Flavor: Cinnamon, brown sugar, and fresh apples create a delicious homemade filling.
- Individual Portions: Each pocket is easy to serve and enjoy.
- Simple Ingredients: Made with everyday baking ingredients.
- Perfect for Holidays: A wonderful addition to Thanksgiving, Christmas, and fall dessert tables.
- Make-Ahead Friendly: Prepare the filling in advance to save time.
🛒 Ingredients
For the Apple Filling
| Ingredient | Quantity |
| Apples, peeled and diced | 3 medium |
| Unsalted butter | 2 tablespoons |
| Brown sugar | ⅓ cup |
| Granulated sugar | 2 tablespoons |
| Ground cinnamon | 1 teaspoon |
| Cornstarch | 1 tablespoon |
| Lemon juice | 1 teaspoon |
| Vanilla extract | 1 teaspoon |
| Ground nutmeg | ¼ teaspoon |
| Water | 2 tablespoons |
For the Pastry
| Ingredient | Quantity |
| Refrigerated pie crusts | 2 packages (4 crusts) |
| All-purpose flour | As needed for rolling |
| Large egg | 1 |
| Milk or water | 1 tablespoon |
| Granulated sugar | 1–2 tablespoons |
| Ground cinnamon | ¼ teaspoon |
Shortcut option: Use two packages of refrigerated crescent dough or ready-made pastry sheets, adjusting the shaping instructions according to the dough.
👩🍳 Step-by-Step Instructions
Step 1: Prepare the Apples
Peel, core, and dice the apples into small, evenly sized pieces.
In a medium saucepan over medium heat, melt the butter. Add the diced apples, brown sugar, granulated sugar, cinnamon, nutmeg, lemon juice, and water.
Stir well and cook for approximately 5–7 minutes, until the apples begin to soften.
Step 2: Thicken the Apple Filling
In a small bowl, mix the cornstarch with 1 tablespoon of cold water until smooth.
Pour the mixture into the saucepan with the apples, stirring continuously.
Cook for another 1–2 minutes until the filling becomes glossy and thick. Remove from the heat and stir in the vanilla extract.
Transfer the apple filling to a bowl and allow it to cool completely before assembling the pastries. This helps prevent the pastry from becoming soggy.
Step 3: Prepare the Pastry
Preheat your oven to 375°F (190°C).
Lightly grease a large rectangular baking dish or line it with parchment paper.
Place the refrigerated pie crusts on a lightly floured surface. Cut each crust into four approximately equal rectangles or squares, depending on its shape.
You should have approximately 8 pastry pieces for the bottom and 8 matching pieces for the tops if using four crusts.
Step 4: Fill the Pastry Pieces
Place one pastry square on your work surface.
Spoon approximately 2 tablespoons of cooled apple filling into the center, leaving a border around the edges.
Avoid adding too much filling, as it can leak during baking.
Brush the edges lightly with water or beaten egg.
Step 5: Fold and Seal
Place another pastry square over the filling.
Gently press around the edges to seal the pastry, removing any trapped air.
Use the back of a fork to crimp the edges securely, creating the decorative pattern shown in the picture.
Repeat with the remaining pastry and filling.
Step 6: Arrange in the Baking Dish
Carefully transfer the assembled apple pockets into the prepared baking dish.
Arrange them in rows, leaving a little space between each pastry.
Use a sharp knife to cut two or three small slits into the top of each pocket. These openings allow steam to escape during baking.
Step 7: Add the Golden Topping
In a small bowl, whisk together the egg and milk.
Brush the tops of the pastries lightly with the egg wash.
In another bowl, combine the granulated sugar and cinnamon. Sprinkle the mixture evenly over the pastries for a lightly sweet, golden finish.
Step 8: Bake Until Golden
Place the baking dish in the preheated oven.
Bake for 25–30 minutes, or until the pastry is puffed and golden brown and the filling is bubbling slightly through the openings.
If the tops brown too quickly, loosely cover the dish with aluminum foil during the final minutes.
Step 9: Cool and Serve
Remove the dish from the oven and allow the apple pie pockets to cool for approximately 10–15 minutes.
Serve warm with vanilla ice cream, whipped cream, or caramel sauce.
💡 Best Tips for Perfect Apple Pie Pockets
- Choose firm apples: Granny Smith, Honeycrisp, and Braeburn apples work especially well.
- Cool the filling completely: Warm filling can soften the pastry and make sealing difficult.
- Cut small apple pieces: Smaller pieces cook more evenly and make the pockets easier to fill.
- Don’t overfill: Too much filling can cause the edges to open during baking.
- Seal carefully: Use a fork to crimp every edge securely.
- Vent the tops: Small openings prevent steam from building up inside.
- Use cold pastry: Keep the pastry refrigerated until you’re ready to assemble.
🍏 Best Ingredient Options
| Ingredient | Recommended Options |
| Apples | Granny Smith, Honeycrisp, Fuji, or Gala |
| Brown Sugar | Light or dark brown sugar |
| Butter | Unsalted butter |
| Cinnamon | Ground cinnamon |
| Pastry | Refrigerated pie crust or puff pastry |
| Sweetener | Brown sugar, granulated sugar, or coconut sugar |
| Flavoring | Vanilla extract, nutmeg, or apple pie spice |
🍯 Recipe Variations
1. Caramel Apple Pie Pockets
Add 2 tablespoons of caramel sauce to the cooled apple filling for a richer dessert. Drizzle additional caramel over the baked pastries.
2. Apple Cinnamon Cream Cheese Pockets
Spread a thin layer of sweetened cream cheese over the pastry before adding the apple filling.
3. Apple Pecan Pie Pockets
Mix ¼ cup of finely chopped toasted pecans into the cooled apple filling for extra crunch.
4. Cranberry Apple Pockets
Add ¼ cup of dried cranberries to the apple mixture for a sweet and slightly tart flavor.
5. Puff Pastry Apple Turnovers
Replace the pie crust with puff pastry sheets for a lighter, airier, and more layered texture.
6. Apple Cheddar Pockets
Add a small amount of finely grated sharp cheddar cheese to the filling for a sweet-and-savory combination.
🍨 What to Serve With Apple Pie Pockets
These warm apple pastries pair beautifully with:
- Homemade vanilla ice cream
- Freshly whipped cream
- Salted caramel sauce
- Cream cheese frosting
- Vanilla custard
- Cinnamon whipped cream
- Chopped toasted pecans
- A cup of hot coffee or tea
For a special holiday dessert, serve each warm pocket with a scoop of vanilla ice cream and a generous drizzle of caramel sauce.
⏰ Make-Ahead Instructions
You can prepare several components ahead of time.
- Prepare the apple filling up to 2 days in advance.
- Allow it to cool completely.
- Store it in an airtight container in the refrigerator.
- Assemble the pastry pockets shortly before baking.
- Brush with egg wash and sprinkle with cinnamon sugar just before placing them in the oven.
You can also assemble the unbaked pockets and refrigerate them, covered, for several hours before baking.
🧊 Storage Instructions
- Room Temperature: Store completely cooled pastries in an airtight container for up to 1 day.
- Refrigerator: Refrigerate in an airtight container for up to 4 days.
- Best Texture: Allow the pastries to cool before storing to prevent condensation from making the crust soggy.
🔥 Reheating Instructions
Oven Method:
- Preheat the oven to 325°F (165°C).
- Place the pastries on a baking sheet.
- Heat for approximately 8–12 minutes until warmed through.
Air Fryer Method:
Reheat at 320°F (160°C) for approximately 3–5 minutes, checking frequently to avoid over-browning.
Microwave Method:
Heat an individual pastry for approximately 15–25 seconds. The filling will warm quickly, although the crust will be softer rather than crisp.
❄️ Freezing Instructions
These apple pie pockets can be frozen before or after baking.
Freezing Before Baking:
- Assemble the pastries and seal the edges.
- Place them on a parchment-lined baking sheet.
- Freeze until firm.
- Transfer to a freezer-safe container or bag.
- Freeze for up to 2 months.
Bake from frozen at 375°F (190°C), adding approximately 5–10 minutes to the baking time. Check that the pastry is fully baked before serving.
Freezing After Baking:
Allow the pastries to cool completely, wrap individually, and freeze in an airtight container for up to 2 months for best quality.
Thaw in the refrigerator before reheating.
⚠️ Common Mistakes to Avoid
- Using warm filling: This can make the pastry soft and difficult to handle.
- Overfilling the pockets: Excess filling may escape during baking.
- Not sealing the edges: Poorly sealed pastry can open in the oven.
- Skipping the steam vents: Without openings, steam can build up inside.
- Using overly juicy apples without thickening: This can create a watery filling.
- Overbaking: Baking too long can make the pastry dry and overly dark.
- Cutting immediately: Allow the pastries to rest so the filling can settle.
📊 Nutrition Estimate
Approximate values per pastry, based on 8 servings.
| Nutrient | Estimated Amount |
| Calories | 300–350 kcal |
| Protein | 4 g |
| Total Fat | 16 g |
| Saturated Fat | 7 g |
| Carbohydrates | 40 g |
| Sugar | 17 g |
| Fiber | 2 g |
| Sodium | 250 mg |
Nutrition will vary depending on the pastry brand, apple variety, and amount of sugar used.
❓ Frequently Asked Questions
1. What are these pastries called?
They can be described as homemade apple pie pockets, baked apple turnovers, or individual apple hand pies. Their rectangular shape and fork-crimped edges give them a classic homemade appearance.
2. Which apples are best for this recipe?
Granny Smith apples are excellent because their tart flavor balances the sweetness of the filling. Honeycrisp and Braeburn are also delicious choices.
3. Can I use store-bought apple pie filling?
Yes! Store-bought apple pie filling is a convenient shortcut. Chop any large apple pieces into smaller pieces before filling the pastries.
4. Can I use puff pastry instead of pie crust?
Absolutely. Puff pastry creates a lighter, crispier, and more layered result. Keep it cold and avoid overfilling.
5. Why did my apple filling leak out?
This usually happens when the pastries are overfilled or the edges are not sealed properly. Leave a clear border around the filling and crimp firmly with a fork.
6. Can I make these pastries without egg wash?
Yes. Brush the tops with milk or heavy cream instead. The pastries may have a slightly less glossy finish but will still bake beautifully.
7. Can I serve them cold?
Yes! They taste delicious at room temperature or chilled, although serving them slightly warm gives the best homemade apple pie experience.
8. How do I keep the pastry crispy?
Allow the pastries to cool before storing them and reheat them in an oven or air fryer rather than the microwave.
9. Can I prepare them for Thanksgiving or Christmas?
Definitely! Prepare the apple filling in advance, assemble the pockets, and bake them shortly before serving. They’re a lovely addition to holiday dessert tables.
❤️ Final Thoughts
These Easy Homemade Apple Pie Pockets are a wonderful way to enjoy the comforting flavors of traditional apple pie in a fun, individual-sized dessert. With their golden pastry, sweet cinnamon apple filling, and lightly crisp sugar topping, they’re sure to become a family favorite.
Whether you’re baking for a holiday celebration, preparing a weekend treat, or simply craving an easy homemade apple dessert, this recipe is delicious, versatile, and simple to customize. Serve them warm with vanilla ice cream or caramel sauce, and enjoy every bite!