Introduction
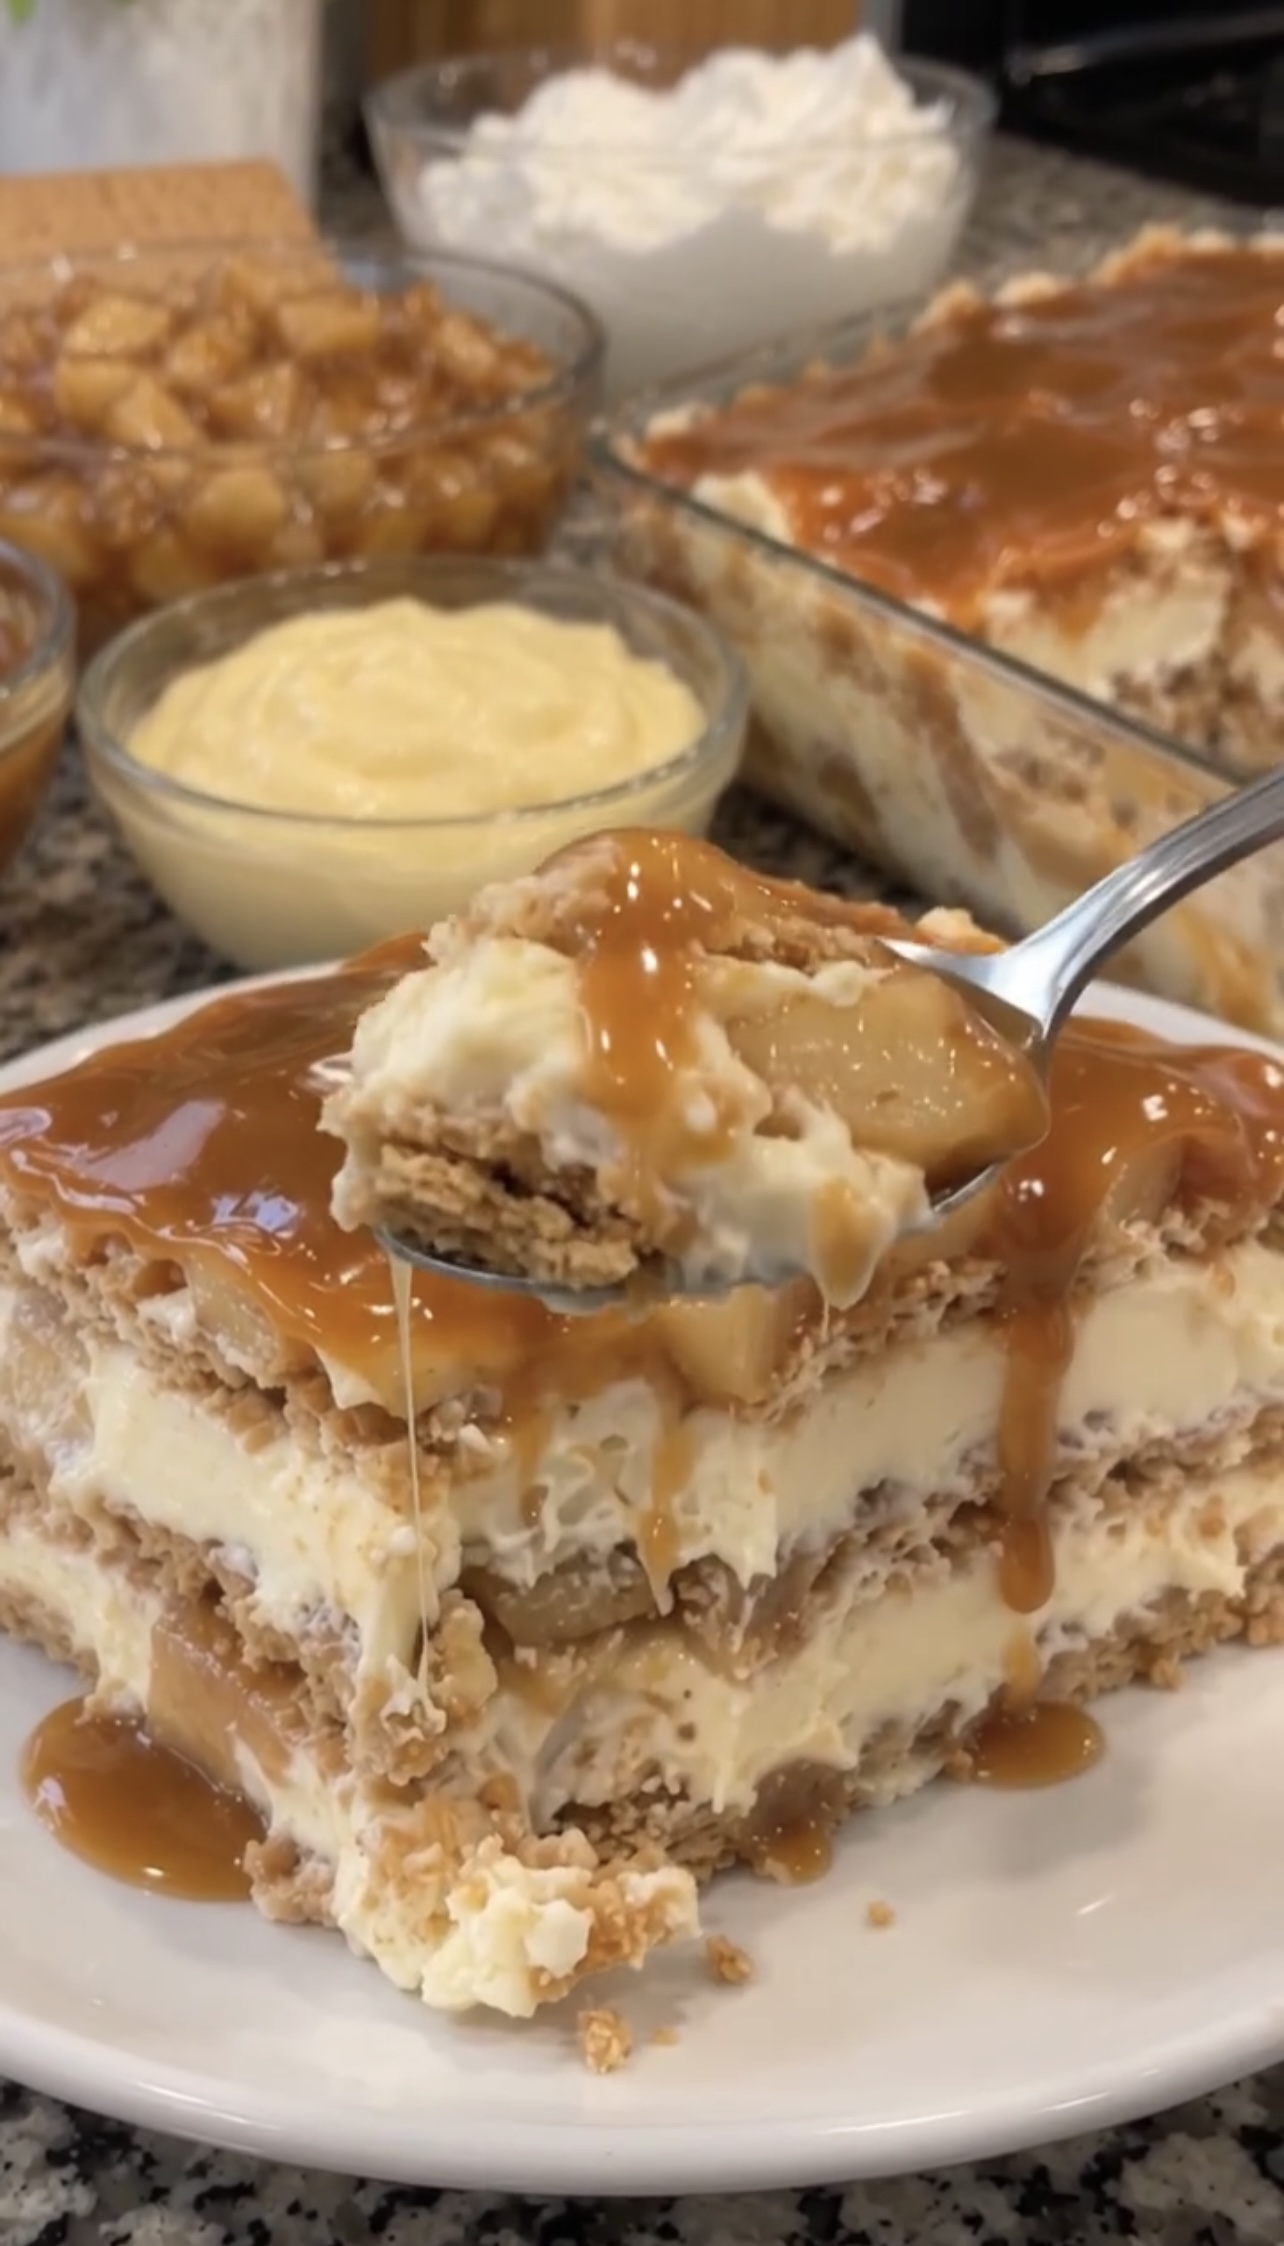
This Salted Caramel Apple Icebox Cake is a dreamy no-bake dessert that combines layers of buttery graham crackers, fluffy cream cheese filling, cinnamon-spiced apples, and rich salted caramel sauce. Every bite delivers the comforting flavors of homemade apple pie with the creamy texture of a chilled icebox cake, making it a delicious choice for autumn celebrations, Thanksgiving dinners, potlucks, and family gatherings.
The best part is that this easy caramel apple dessert requires no oven and comes together with simple ingredients. As it chills, the graham crackers soften into delicate cake-like layers that blend beautifully with the creamy filling and tender apples. Prepare it ahead of time, refrigerate until set, and serve a beautiful dessert that tastes even better the next day.
📋 Recipe Overview
| Recipe Detail | Information |
| Recipe Name | Salted Caramel Apple Icebox Cake |
| Prep Time | 30 minutes |
| Cook Time | 8–10 minutes |
| Chill Time | At least 4 hours |
| Total Time | Approximately 4 hours 40 minutes |
| Servings | 9–12 slices |
| Course | Dessert |
| Cuisine | American-inspired |
| Difficulty | Easy |
| Cooking Method | Stovetop preparation and refrigerator chilling |
| Main Ingredients | Apples, graham crackers, cream cheese, heavy cream, and caramel sauce |
| Flavor Profile | Sweet, buttery, creamy, and warmly spiced |
| Best Occasion | Fall gatherings, Thanksgiving, potlucks, and holidays |
❤️ Why You’ll Love This Recipe
1. No Oven Required
This no-bake icebox cake is perfect when you want an impressive homemade dessert without heating up the kitchen.
2. Classic Caramel Apple Flavor
Tender apples cooked with brown sugar and cinnamon create a delicious filling reminiscent of homemade apple pie.
3. Creamy, Fluffy Layers
The combination of cream cheese and whipped cream creates a light, smooth filling that balances the sweetness of the apples and caramel.
4. A Beautiful Cake-Like Texture
As the dessert chills, the graham crackers absorb moisture from the cream filling and soften into delicate layers.
5. Perfect for Making Ahead
Prepare the cake the night before a gathering and let the refrigerator do most of the work.
6. Easy to Customize
Use digestive biscuits, vanilla pudding, homemade caramel, or a mixture of sweet and tart apples to create your preferred flavor.
7. Ideal for Holidays and Parties
The layered presentation looks beautiful in a glass baking dish, making this dessert a wonderful addition to Thanksgiving tables, Christmas celebrations, and autumn potlucks.
🛒 Ingredients
1. Spiced Apple Layer
| Ingredient | Quantity |
| Medium apples, peeled, cored, and diced | 4 |
| Unsalted butter | 2 tablespoons |
| Brown sugar | 2 tablespoons |
| Ground cinnamon | ½ teaspoon |
| Water | 1 tablespoon, plus more if needed |
Best apples: Granny Smith apples provide a tart flavor that balances the caramel, while Honeycrisp apples offer sweetness and a crisp texture. Gala apples are another good option.
For the best flavor, combine two varieties, such as Granny Smith and Honeycrisp.
2. Cream Cheese Filling
| Ingredient | Quantity |
| Full-fat cream cheese, softened | 8 oz (225 g) |
| Heavy whipping cream, chilled | 1 cup (240 ml) |
| Powdered sugar | ⅓ cup (approximately 40 g) |
| Vanilla extract | 1 teaspoon |
| Prepared vanilla pudding or pastry cream, optional | 1 cup |
The cream cheese provides richness, while the whipped cream creates a light and fluffy texture.
Optional: Adding 1 cup of prepared, completely chilled vanilla pudding or pastry cream creates a softer, more custard-like filling. Because it adds moisture, the finished cake may need additional chilling time. For the most reliable structure, use the cream cheese and whipped cream filling as written.
3. Graham Cracker Layers and Caramel Topping
| Ingredient | Quantity |
| Graham crackers | 3–4 sleeves, as needed |
| Salted caramel sauce | 1 cup |
| Extra caramel sauce for serving | Optional |
| Flaky sea salt for garnish | Optional |
The exact number of crackers depends on their size and how tightly you arrange them in your dish.
If graham crackers aren’t available, digestive biscuits or plain tea biscuits work well.
Caramel tip: Use a thick salted caramel sauce that drizzles easily but isn’t watery. A thinner sauce can make the layers overly wet.
👩🍳 Step-by-Step Instructions
Step 1: Prepare the Spiced Apples
- Peel, core, and dice the four apples into small, evenly sized pieces.
- Place a large skillet over medium heat.
- Add the butter and allow it to melt.
- Stir in the diced apples, brown sugar, cinnamon, and 1 tablespoon of water.
- Cook for approximately 6–8 minutes, stirring occasionally.
- If the apples begin sticking before they soften, add another tablespoon of water.
- Continue cooking until the apples are tender but still hold their shape and are coated in a glossy cinnamon syrup.
- Remove the skillet from the heat.
- Transfer the apples to a shallow bowl and let them cool completely.
Important: Do not add warm apples to the cream filling. The heat can soften the filling and make the layers difficult to assemble.
For a firmer cake, cook the apples until just tender rather than turning them into applesauce.
Step 2: Whip the Heavy Cream
- Pour the cold heavy whipping cream into a clean mixing bowl.
- Add the powdered sugar and vanilla extract.
- Beat with an electric mixer on medium-high speed.
- Continue until stiff peaks form and the cream holds its shape.
- Set aside while preparing the cream cheese.
The cream should be thick and fluffy without looking grainy. Stop mixing once it reaches stiff peaks to avoid overwhipping.
For best results, chill the bowl and beaters for 10–15 minutes before whipping.
Step 3: Prepare the Cream Cheese Mixture
- Place the softened cream cheese in a separate large bowl.
- Beat with an electric mixer until smooth and creamy.
- Scrape down the sides of the bowl to remove any lumps.
- If using the optional vanilla pudding, mix the prepared, chilled pudding into the cream cheese until smooth.
- Gently fold the whipped cream into the cream cheese mixture in two or three additions.
- Continue folding until the filling is evenly combined and fluffy.
Avoid beating vigorously after adding the whipped cream. Gentle folding helps preserve the air that gives the filling its light texture.
The finished mixture should be thick enough to spread over the crackers without running.
Step 4: Prepare the Baking Dish
- Choose a 9 × 13-inch baking dish.
- Make sure the dish is clean and completely dry.
- Arrange a single layer of graham crackers across the bottom.
- Break a few crackers into smaller pieces to fill any gaps.
A close-fitting cracker layer helps the cake hold together when sliced.
If your crackers are particularly thin or your dish is large, you may need more than one sleeve. Keep the remaining crackers nearby for the next layers.
Step 5: Add the First Cream Layer
- Spoon approximately one-third of the cream mixture over the graham crackers.
- Spread it evenly with an offset spatula or the back of a spoon.
- Make sure the filling reaches the edges of the dish.
- Drizzle a small amount of salted caramel sauce over the cream.
Use a light hand with the caramel at this stage. Too much liquid between the layers can make the cake difficult to slice neatly.
Step 6: Add the First Apple Layer
- Spoon half of the cooled cinnamon apples over the cream.
- Spread them into an even layer.
- Distribute the apples as evenly as possible.
- Add another light drizzle of salted caramel sauce.
Try to include both the tender apple pieces and a little of their thickened cinnamon syrup.
Avoid adding excess watery liquid from the skillet.
Step 7: Build the Second Layer
- Arrange another layer of graham crackers over the apples.
- Spread approximately half of the remaining cream mixture over the crackers.
- Add the remaining cooked apples.
- Drizzle lightly with salted caramel sauce.
Keep the layers level so the finished dessert looks attractive when cut.
Step 8: Finish the Layers
- Arrange a final layer of graham crackers over the second apple layer.
- Spread the remaining cream mixture evenly across the top.
- Smooth the surface with a spatula.
- Cover the dish tightly with plastic wrap or a suitable lid.
The top cream layer helps create a smooth finish and gives the caramel topping an attractive base.
Step 9: Add the Salted Caramel Topping
You can add the caramel before chilling or just before serving.
For the neatest presentation, chill the assembled cake first, then add the final caramel drizzle before serving.
- If the caramel is too thick, warm it gently for a few seconds.
- Let it cool until just pourable.
- Drizzle the caramel over the chilled cream layer.
- Use a spoon to create decorative lines or a loose swirl.
- Sprinkle with a tiny pinch of flaky sea salt if desired.
Avoid pouring hot caramel directly onto the cream filling.
Step 10: Chill Until Set
- Cover the assembled cake.
- Refrigerate for at least 4 hours.
- For the best cake-like texture, refrigerate overnight.
- Before serving, check that the crackers have softened and the layers hold together.
Four hours creates a softer dessert, while overnight chilling allows the crackers to absorb more moisture and makes the cake easier to cut.
Step 11: Slice and Serve
- Remove the cake from the refrigerator when ready to serve.
- Use a sharp knife to cut it into 9–12 portions.
- Wipe the knife between cuts for cleaner slices.
- Add extra salted caramel sauce if desired.
- Serve chilled.
Each slice should reveal distinct layers of soft crackers, fluffy cream, tender cinnamon apples, and caramel.
⭐ Best Tips for the Perfect Icebox Cake
Choose the Right Apples
A mixture of tart and sweet apples creates a balanced filling. Granny Smith and Honeycrisp are especially good together.
Cool the Apples Completely
Warm apples can melt the cream filling and cause the layers to slide.
Whip the Cream Properly
Stiff peaks help the filling maintain its shape during chilling and slicing.
Use Softened Cream Cheese
Room-temperature cream cheese blends more smoothly and prevents lumps.
Don’t Overcook the Apples
Cook them until tender but not mushy. Small apple pieces should remain visible in each slice.
Avoid Excess Liquid
If the cooked apples release a lot of liquid, allow the mixture to cool and use a slotted spoon to transfer the apples.
Don’t Oversaturate the Layers
The crackers soften naturally in the refrigerator. You don’t need to soak them in caramel or milk.
Chill Overnight for the Best Texture
Although four hours works, overnight refrigeration generally creates a more cohesive, cake-like dessert.
Use Thick Caramel Sauce
A thick sauce gives the cake a rich caramel flavor without making the top watery.
Decorate Just Before Serving
Add extra caramel and flaky sea salt shortly before serving for the freshest appearance.
🍎 Best Ingredient Options
Apple Varieties
| Apple Variety | Flavor and Texture |
| Granny Smith | Tart, firm, and excellent for balancing sweetness |
| Honeycrisp | Sweet-tart with a pleasant texture |
| Gala | Mildly sweet and softer when cooked |
| Pink Lady | Tangy, aromatic, and relatively firm |
| Fuji | Sweet and juicy |
For the best results, use apples that retain some texture after cooking.
Cracker Alternatives
| Alternative | Result |
| Graham crackers | Classic honey-like flavor |
| Digestive biscuits | Buttery, slightly nutty flavor |
| Plain tea biscuits | Mild sweetness and a delicate texture |
| Biscoff biscuits | Strong caramelized spice flavor |
| Vanilla wafers | Sweet, vanilla-forward layers |
Biscoff biscuits pair particularly well with salted caramel, but the finished dessert will be sweeter.
Cream Filling Options
| Ingredient Choice | Effect |
| Full-fat cream cheese | Rich, tangy, and stable filling |
| Mascarpone | Milder, richer flavor |
| Prepared vanilla pudding | Softer, custard-like texture |
| Pastry cream | Rich vanilla flavor and a more traditional custard layer |
| Whipped topping | Convenient alternative, with a different texture and sweetness |
If using pudding or pastry cream, make sure it is completely chilled before combining it with the other ingredients.
Caramel Options
You can use homemade salted caramel sauce or a good-quality store-bought version.
For homemade caramel, allow it to cool before assembling the dessert. Adjust the salt to taste, especially if using salted butter.
🔄 Recipe Variations
1. Biscoff Salted Caramel Apple Icebox Cake
Replace the graham crackers with Biscoff biscuits. The caramelized biscuit flavor pairs beautifully with the apples and salted caramel sauce.
2. Apple Cinnamon Cheesecake Icebox Cake
Add ½ teaspoon of extra cinnamon to the cream cheese mixture and sprinkle a little cinnamon over the finished dessert.
3. Caramel Apple Pecan Icebox Cake
Add ½ cup of toasted, chopped pecans between the layers. Their nutty crunch contrasts nicely with the soft cream and apples.
4. Apple Pie Icebox Cake
Add a pinch of ground nutmeg and a small pinch of ground cloves to the apples along with the cinnamon.
These warm spices give the dessert a classic apple pie flavor.
5. Vanilla Pudding Apple Icebox Cake
Fold 1 cup of prepared, chilled vanilla pudding into the cream cheese before adding the whipped cream.
This variation has a softer, more custard-like filling. Because the additional pudding adds moisture, overnight chilling is especially important.
6. Chocolate Caramel Apple Cake
Drizzle a little melted chocolate over the caramel topping or add a thin layer of chocolate shavings between the crackers and cream.
Dark chocolate works particularly well because its slight bitterness balances the sweetness.
7. Apple Butter Icebox Cake
Swirl 2–3 tablespoons of apple butter into the cream filling before assembling the cake. Use a light hand so the filling remains thick enough to hold its shape.
8. Mini Caramel Apple Icebox Cakes
Assemble individual desserts in small glasses or jars using broken crackers, cream filling, and cinnamon apples.
Refrigerate until the crackers soften, then finish with caramel sauce.
Individual portions are convenient for parties and make serving easier.
🍽️ What to Serve With Salted Caramel Apple Icebox Cake
This dessert is rich and sweet, so fresh fruit or a simple beverage makes an excellent accompaniment.
| Serving Option | Why It Works |
| Fresh apple slices | Reinforce the apple flavor |
| Fresh strawberries | Add a refreshing fruity contrast |
| Toasted pecans | Provide a nutty crunch |
| Hot coffee | Balances the sweetness |
| Espresso | Complements the caramel flavor |
| Black tea | Offers a lighter accompaniment |
| Cinnamon tea | Echoes the warm apple spices |
| Vanilla ice cream | Creates an extra-indulgent dessert |
| Lightly sweetened whipped cream | Adds an elegant finishing touch |
Serving suggestion: Serve a chilled slice with hot coffee and a sprinkle of toasted pecans for a cozy autumn dessert.
⏰ Make-Ahead Instructions
This icebox cake is designed to be prepared ahead of time.
Prepare It the Day Before
- Cook the apples and allow them to cool completely.
- Prepare the cream cheese filling.
- Assemble the cracker, cream, apple, and caramel layers.
- Cover the dish tightly.
- Refrigerate overnight.
- Add the final caramel drizzle and optional garnish shortly before serving.
Overnight chilling improves the texture and makes the dessert easier to cut.
Prepare the Apple Filling Ahead
The spiced apples can be cooked in advance and refrigerated in a covered container.
Allow them to cool before refrigerating, and use them within 3–4 days.
Before assembling the cake, make sure the apples are cold and not surrounded by excess liquid.
Prepare It for a Party
Keep the cake refrigerated until serving time. If transporting it, place the covered dish in an insulated cooler with ice packs.
For the best presentation, add decorative caramel drizzles and crunchy garnishes shortly before serving.
🧊 Storage Instructions
Refrigerator
Cover the dish tightly or transfer leftover slices to an airtight container.
Store at 40°F (4°C) or below and enjoy within 3 days for the best texture and quality.
The crackers will continue softening during storage, so the dessert may become more pudding-like by the third day.
Individual Slices
Place slices in an airtight container, separating layers with parchment paper if stacking is necessary.
Keep refrigerated until ready to serve.
Room Temperature
Because this dessert contains cream cheese and whipped cream, do not leave it at room temperature for more than 2 hours, or more than 1 hour when the temperature exceeds 90°F (32°C).
Return leftovers to the refrigerator promptly.
❄️ Can You Freeze Salted Caramel Apple Icebox Cake?
Freezing is possible, but it is not the best option for this recipe.
The whipped cream and cream cheese filling may change texture after thawing, the apples can release moisture, and the crackers may become soggy.
For the best results, prepare the cake fresh and refrigerate it overnight.
If you choose to freeze leftovers, place them in an airtight freezer-safe container and use within approximately 1 month for the best quality. Thaw slowly in the refrigerator and expect some texture changes.
⚠️ Common Mistakes to Avoid
1. Adding Warm Apples to the Filling
Problem: The cream softens and the layers may slide.
Solution: Cool the apples completely before assembling the cake.
2. Underwhipping the Cream
Problem: The filling becomes too loose to hold its shape.
Solution: Whip the cream until stiff peaks form before folding it into the cream cheese.
3. Overwhipping the Cream
Problem: The cream becomes grainy and difficult to fold smoothly.
Solution: Stop mixing as soon as the cream holds firm peaks.
4. Leaving Lumps in the Cream Cheese
Problem: The filling has an uneven texture.
Solution: Let the cream cheese soften at room temperature and beat it until smooth before adding the whipped cream.
5. Using Apples That Are Too Soft
Problem: The apple layer becomes mushy and blends into the filling.
Solution: Use firm apples and cook only until tender.
6. Adding Too Much Apple Liquid
Problem: Excess moisture makes the layers watery.
Solution: Let the apples cool and drain excess liquid before layering.
7. Using Too Much Caramel Between Layers
Problem: The crackers become overly wet and the cake may be difficult to slice.
Solution: Use thin drizzles between layers and save most of the caramel for the top.
8. Not Chilling Long Enough
Problem: The crackers remain firm and the cake falls apart when sliced.
Solution: Refrigerate for at least 4 hours, preferably overnight.
9. Using Hot Caramel on the Cream
Problem: The topping softens the filling.
Solution: Cool the caramel until just pourable before drizzling.
10. Cutting the Cake Immediately After Chilling Begins
Problem: The layers have not had enough time to settle.
Solution: Wait until the full chilling time has passed, then cut with a sharp knife.
📊 Nutrition Estimate
The following values are approximate estimates per serving, assuming the recipe makes 12 servings and uses graham crackers, the cream cheese and whipped cream filling, and salted caramel sauce.
| Nutrient | Estimated Amount Per Serving |
| Calories | 350–450 kcal |
| Protein | 4–6 g |
| Total Fat | 20–27 g |
| Saturated Fat | 11–16 g |
| Carbohydrates | 38–50 g |
| Sugars | 25–35 g |
| Fiber | 2–3 g |
| Sodium | 250–450 mg |
Actual nutrition values depend on the cracker brand, cream cheese, caramel sauce, apple varieties, and portion size. Adding vanilla pudding or pastry cream will change the estimates.
❓ Frequently Asked Questions
Can I Make Salted Caramel Apple Icebox Cake the Day Before?
Yes. In fact, overnight chilling is recommended because it gives the crackers time to soften and the layers time to set.
Add any crunchy garnishes just before serving.
Do I Need to Bake the Graham Crackers?
No. The crackers soften as they absorb moisture from the cream filling during refrigeration. This creates the cake-like texture that defines an icebox cake.
Which Apples Are Best for This Recipe?
Granny Smith and Honeycrisp are excellent choices. Granny Smith apples provide tartness, while Honeycrisp apples add sweetness and retain a pleasant texture.
Using a mixture of the two gives the best balance.
Can I Use Store-Bought Caramel Sauce?
Absolutely. A thick salted caramel sauce works well and saves preparation time.
If your sauce is very thin, use less between the layers and reserve the majority for the top.
Can I Use Cool Whip Instead of Heavy Cream?
Yes. Prepared whipped topping can replace the whipped cream, although the texture and sweetness will differ.
Fold it gently into the softened cream cheese and adjust the powdered sugar to taste.
Can I Add Vanilla Pudding to the Filling?
Yes. Add approximately 1 cup of prepared, chilled vanilla pudding to the cream cheese before folding in the whipped cream.
The filling will be softer and more custard-like, so overnight chilling is recommended.
Why Is My Icebox Cake Too Soft?
The filling may be too loose, the apples may have released too much liquid, or the dessert may not have chilled long enough.
Make sure the cream is whipped to stiff peaks, drain excess apple liquid, and allow the assembled cake to chill overnight.
Why Are My Graham Crackers Still Hard?
The cake may need more chilling time, or the filling may be too thick to soften the crackers efficiently.
Cover the dish and refrigerate overnight. The crackers should gradually become tender and cake-like.
Can I Use Biscoff Biscuits Instead of Graham Crackers?
Yes. Biscoff biscuits add a stronger caramelized flavor that pairs especially well with the apples and salted caramel.
Because they are already sweet, you may want to use slightly less caramel between the layers.
Can I Make This Dessert in Individual Cups?
Yes. Layer the crackers, cream filling, apples, and caramel in small dessert cups or jars.
Chill for at least 4 hours and add the final caramel topping just before serving.
How Long Does This Cake Last in the Refrigerator?
For the best texture and quality, enjoy it within 3 days. Keep it covered and refrigerated at 40°F (4°C) or below.
Can I Freeze the Leftovers?
You can, but freezing may affect the texture of the cream filling and apples. Refrigeration is the preferred storage method for this dessert.
🍎 Final Thoughts
This Salted Caramel Apple Icebox Cake is a delicious no-bake dessert that combines the familiar flavors of cinnamon apples, buttery crackers, fluffy cream cheese filling, and rich salted caramel. Its beautiful layers make it look impressive, while the simple preparation makes it easy enough for home cooks of any experience level.
For the best results, cook the apples until just tender, cool them completely, whip the cream to stiff peaks, and let the assembled cake chill overnight. Finish with a generous caramel drizzle and a little flaky sea salt for a sweet-and-salty dessert that’s perfect for autumn gatherings, Thanksgiving, and family celebrations.
Make it ahead, keep it chilled, and enjoy every creamy, caramel-filled bite!