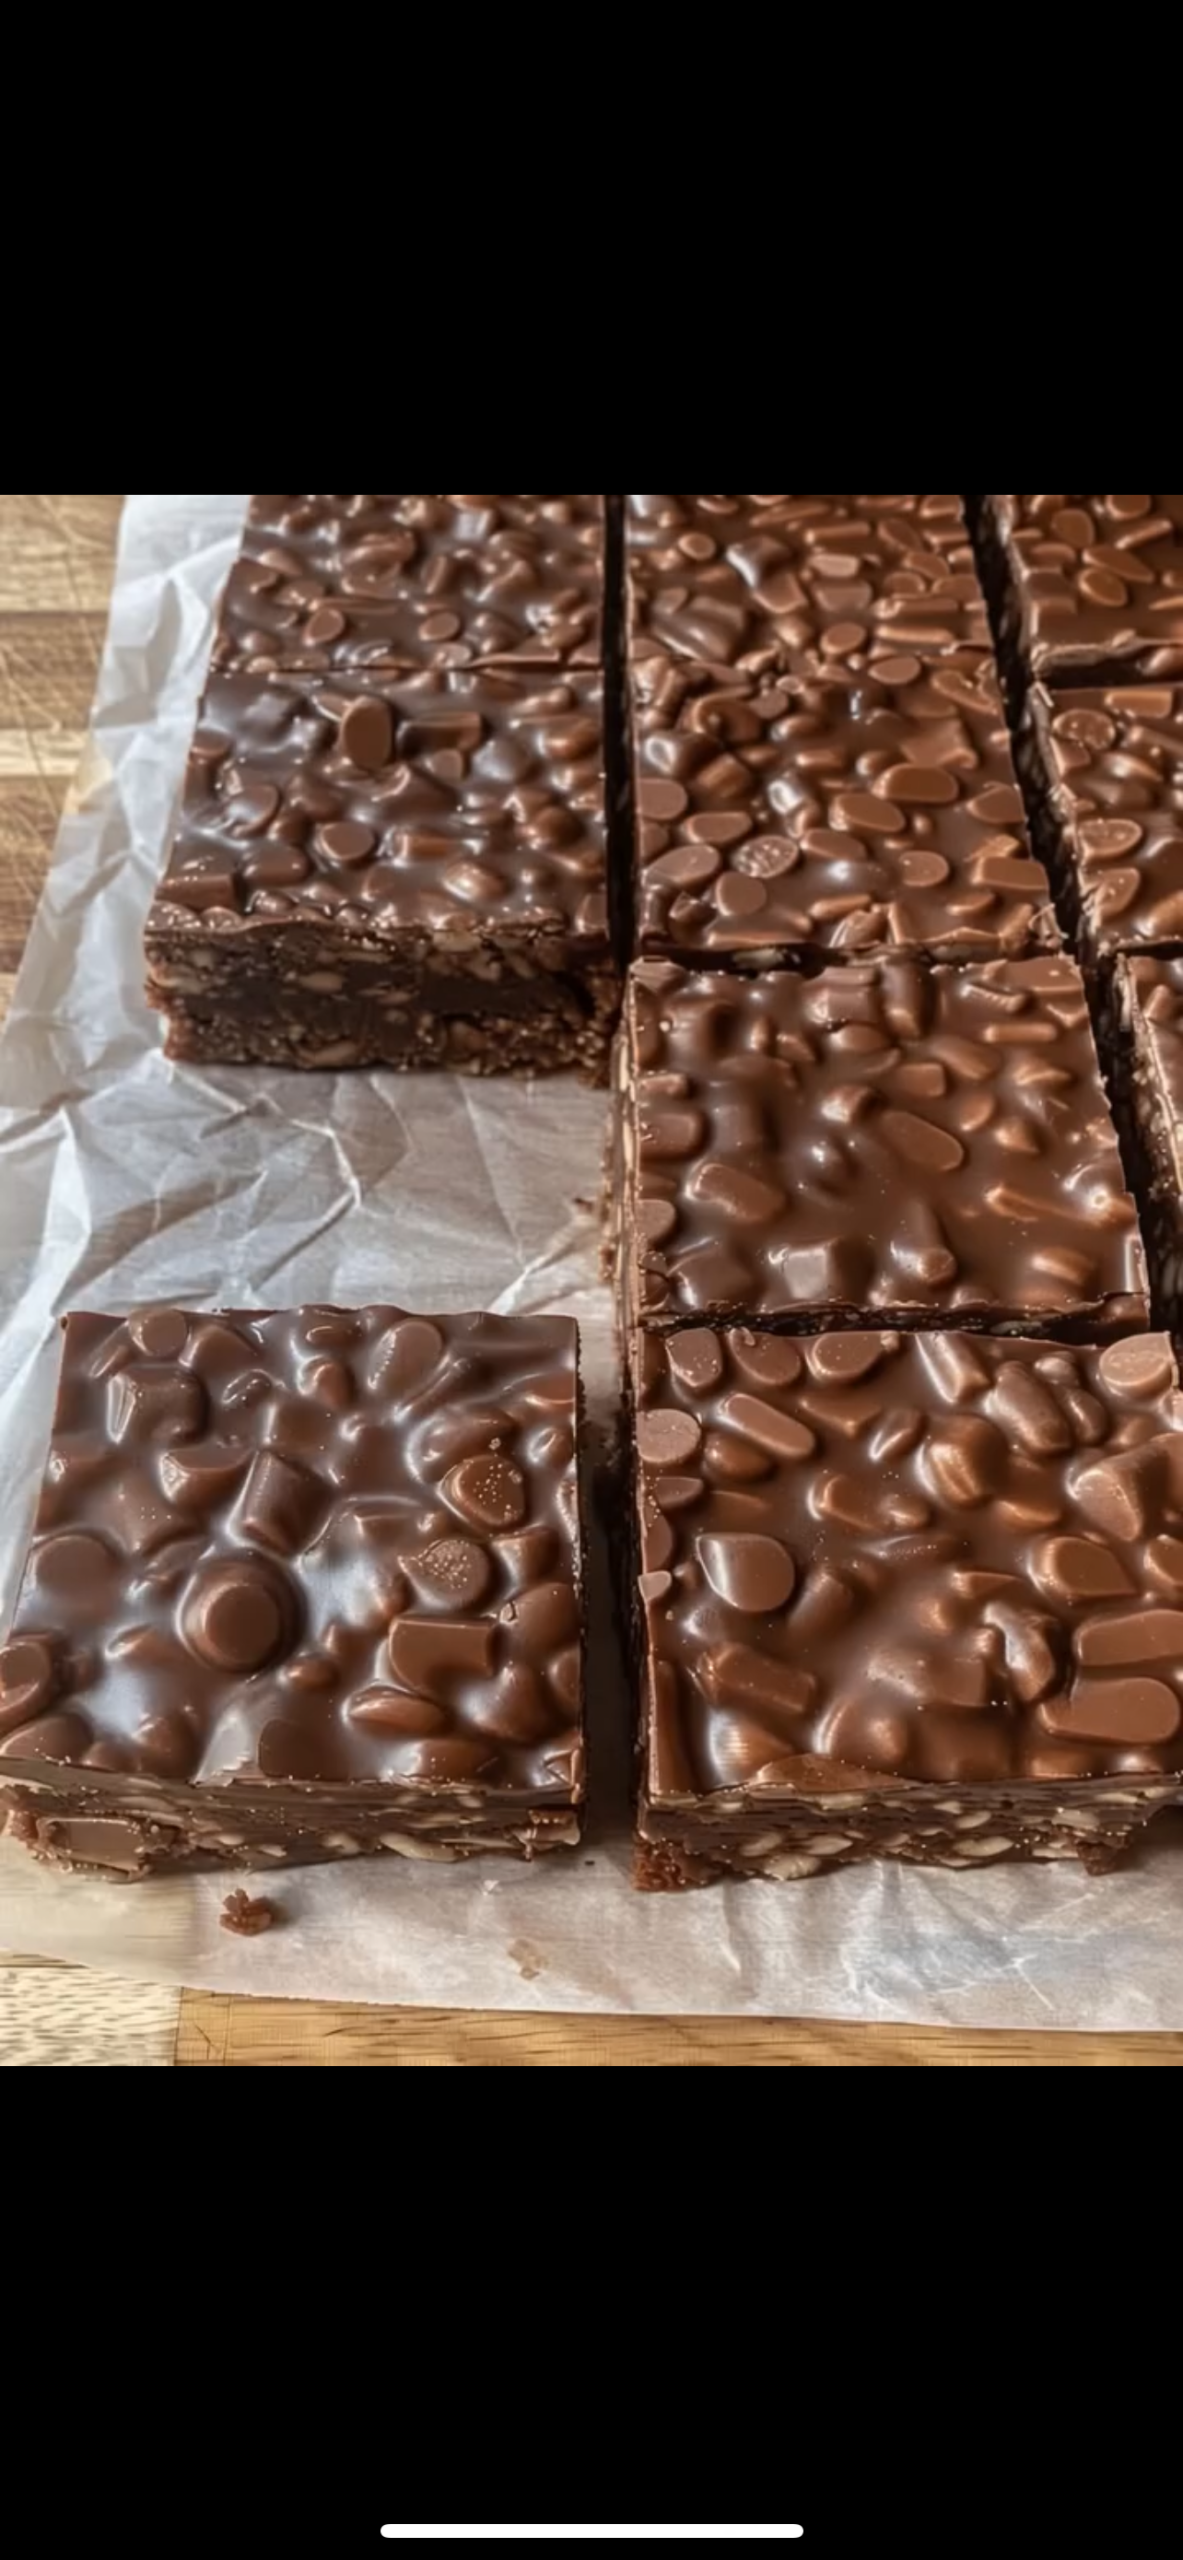
Rich, fudgy, and packed with crunchy nuts and chocolate pieces, these No-Bake Chocolate Crunch Bars are an irresistible homemade treat for chocolate lovers! With a thick chocolate base, a satisfying crunchy center, and a glossy chocolate topping loaded with chocolate chips, every bite delivers the perfect combination of smoothness and crunch.
Inspired by the image, these bars are cut into thick squares with a shiny chocolate coating and plenty of chocolate pieces on top. They’re easy to prepare, require no oven, and are perfect for parties, holiday dessert trays, lunchbox treats, or whenever you’re craving a rich chocolate dessert.
This recipe uses chocolate, peanut butter, crispy rice cereal, and chopped nuts to create a firm, sliceable texture similar to the bars shown.
🍽️ Recipe Overview
| Category | Details |
| Recipe Name | No-Bake Chocolate Crunch Bars |
| Prep Time | 20 minutes |
| Chill Time | 2–3 hours |
| Total Time | About 3 hours |
| Servings | 16 bars |
| Pan Size | 8 × 8-inch square pan |
| Difficulty | Easy |
| Cooking Method | No-bake |
| Texture | Fudgy, crunchy, and chocolatey |
❤️ Why You’ll Love These Chocolate Bars
- 🍫 Rich chocolate flavor: Chocolate forms the foundation of both the bars and their glossy topping.
- 🥜 Delicious crunch: Peanut butter, crispy rice cereal, and chopped nuts add contrasting textures.
- ❄️ No oven required: Simply melt, mix, layer, and chill.
- ⏰ Perfect make-ahead dessert: Prepare them several hours before serving.
- 🎉 Great for sharing: Cut them into squares for parties, potlucks, or holiday dessert platters.
- 🍬 Easy to customize: Add caramel, coconut, pretzels, or your favorite nuts.
🛒 Ingredients
🍫 For the Chocolate Crunch Base
| Ingredient | Amount |
| Semi-sweet chocolate chips | 2 cups (340 g) |
| Creamy peanut butter | ¾ cup (190 g) |
| Crispy rice cereal | 2 cups (about 55 g) |
| Chopped roasted peanuts or almonds | ½ cup (60 g) |
| Vanilla extract | 1 tsp |
| Salt | Pinch, optional |
🍫 For the Chocolate Topping
| Ingredient | Amount |
| Milk chocolate chips | 2 cups (340 g) |
| Coconut oil or neutral vegetable oil | 1 tbsp, optional |
| Chocolate chips or chocolate pieces | ½–¾ cup (85–130 g) |
Ingredient note: The exact ingredients cannot be confirmed from the image alone. This version is designed to reproduce the thick, chocolate-covered bars shown.
👩🍳 Step-by-Step Instructions
1. Prepare the Pan
Line an 8 × 8-inch square baking pan with parchment paper, leaving some overhang on the sides.
The overhang will make it easier to lift the chilled chocolate slab out of the pan later.
Set aside.
2. Melt the Chocolate
Place the semi-sweet chocolate chips and peanut butter in a microwave-safe bowl.
Microwave in 20–30-second intervals, stirring after each interval, until the mixture is smooth.
Alternatively, melt them together in a heatproof bowl over a saucepan of gently simmering water.
Avoid overheating the chocolate, as it can become thick or grainy.
Stir in the vanilla extract and optional pinch of salt.
3. Add the Crunchy Ingredients
Allow the chocolate mixture to cool for 2–3 minutes so it isn’t excessively hot.
Fold in the crispy rice cereal and chopped nuts.
Stir gently until everything is evenly coated.
The mixture should be thick, glossy, and full of crunchy pieces.
4. Press Into the Pan
Transfer the mixture to the prepared pan.
Spread it evenly using a spatula.
Press gently to create a compact, level base without crushing all the cereal.
Refrigerate for approximately 30–45 minutes, or until the base is firm enough to support the topping.
5. Prepare the Chocolate Topping
Place the milk chocolate chips in a clean microwave-safe bowl.
If desired, add 1 tablespoon of coconut oil to create a smoother, slightly glossier topping.
Microwave in short intervals, stirring frequently, until melted and smooth.
Let the chocolate cool slightly before spreading it over the base.
6. Add the Chocolate Layer
Pour the melted chocolate over the chilled base.
Use an offset spatula to spread it evenly to the edges.
While the topping is still wet, scatter the extra chocolate chips or chocolate pieces across the surface.
Press them very gently into the chocolate so they adhere.
For the appearance shown in the image, distribute the chocolate pieces generously rather than clustering them in one area.
7. Chill Until Firm
Place the pan in the refrigerator for 1½–2 hours, or until the chocolate is fully set.
For easier cutting, the slab should feel firm but not rock-hard.
8. Slice Into Bars
Use the parchment paper to lift the chocolate slab out of the pan.
Place it on a cutting board.
For neat squares, warm a large sharp knife under hot water, dry it thoroughly, and cut straight down.
Repeat between cuts.
If the chocolate is too hard and begins to crack, let it sit at room temperature for 5–10 minutes before continuing.
Arrange the bars on a serving platter and enjoy!
⭐ Best Tips for Perfect Chocolate Crunch Bars
Use good-quality chocolate
Chocolate is the main flavor, so choose a brand you enjoy eating on its own.
Melt gently
Short microwave intervals and frequent stirring help prevent scorching.
Don’t crush the cereal
Fold it into the chocolate gently to preserve the crisp texture.
Let the base firm up before adding the topping
This helps the layers remain distinct and creates a cleaner finish.
Add the topping pieces before the chocolate sets
The chocolate pieces need a slightly wet surface to stick properly.
Use a warm knife
A warm, dry knife creates cleaner edges and reduces cracking.
Avoid excessive coconut oil
A little oil can improve the shine, but too much may make the topping soft at room temperature.
🍫 Best Ingredient Options
Semi-Sweet Chocolate
Semi-sweet chocolate provides a balanced flavor that prevents the bars from becoming overwhelmingly sweet.
Milk Chocolate
Milk chocolate creates a sweeter topping similar to many commercial chocolate bars.
Peanut Butter
Creamy peanut butter creates a smooth base and adds a roasted, nutty flavor.
Crispy Rice Cereal
Crispy rice cereal creates a light crunch without making the bars excessively heavy.
Nuts
Peanuts are a natural pairing with chocolate, but almonds, hazelnuts, and pecans also work beautifully.
Chocolate Pieces
Use milk chocolate chips, semi-sweet chips, chopped chocolate, or chocolate buttons for the topping.
🍬 Recipe Variations
1. Chocolate Peanut Butter Bars
Increase the peanut butter slightly and sprinkle chopped roasted peanuts over the chocolate topping.
2. Rocky Road Chocolate Bars
Add mini marshmallows and chopped almonds to the base.
Allow the chocolate mixture to cool slightly before folding in the marshmallows so they don’t melt completely.
3. Salted Caramel Chocolate Bars
Drizzle a thin layer of caramel over the base before adding the chocolate topping. Finish with a small pinch of flaky sea salt.
4. Dark Chocolate Crunch Bars
Use dark chocolate for both layers to create a richer, less-sweet dessert.
5. Coconut Chocolate Bars
Add ½ cup shredded coconut to the base and sprinkle toasted coconut over the top.
6. Pretzel Chocolate Bars
Replace some of the crispy rice cereal with crushed pretzels for a sweet-and-salty combination.
7. Almond Chocolate Bars
Use almond butter instead of peanut butter and add chopped roasted almonds.
☕ What to Serve With Chocolate Crunch Bars
These rich chocolate bars pair especially well with:
- Fresh strawberries
- Raspberries
- Vanilla ice cream
- Whipped cream
- Hot coffee
- Cappuccino
- Cold milk
- Black tea
- Fresh fruit platters
For a dessert platter, arrange the bars with strawberries and small pieces of dark chocolate for a simple, attractive presentation.
⏰ Make-Ahead Instructions
These bars are ideal for preparing ahead of time.
Make them the day before serving and allow the chocolate layers to set completely in the refrigerator.
Once firm, cover the pan tightly or transfer the bars to an airtight container.
For parties, slice them shortly before serving for the neatest edges.
🧊 Storage Instructions
Store the bars in an airtight container.
- At room temperature: Up to 2 days in a cool environment, depending on the chocolate and peanut butter used.
- In the refrigerator: Up to 1 week for best quality.
- Serving tip: Let refrigerated bars sit at room temperature for 5–10 minutes before eating for a smoother texture.
If your kitchen is warm, refrigeration is the better option because the chocolate topping can soften.
🔥 Reheating
These are no-bake chocolate bars, so reheating isn’t necessary.
If they become too firm in the refrigerator, leave them at room temperature for a few minutes before serving.
Avoid microwaving the finished bars, as the chocolate topping can melt unevenly.
❄️ Freezing Instructions
These bars freeze well.
- Allow the chocolate to set completely.
- Slice into individual portions.
- Place parchment paper between layers.
- Transfer to an airtight freezer-safe container.
- Freeze for up to 2 months.
To serve, thaw the bars in the refrigerator or let them sit at room temperature briefly while still covered to reduce condensation on the chocolate surface.
⚠️ Common Mistakes to Avoid
Overheating the chocolate
Chocolate can scorch quickly. Melt it gradually and stir often.
Adding too much oil
Excess oil can prevent the topping from setting firmly.
Using too much cereal
Too much cereal can make the base crumbly and difficult to slice.
Cutting before the chocolate sets
The topping may smear and the bars may lose their shape.
Cutting while the slab is too cold
Very cold chocolate can crack. Let it soften slightly before slicing.
Storing in a warm place
The chocolate topping may soften or melt, especially in warm weather.
📊 Nutrition Estimate
Approximate values per bar, assuming 16 servings:
| Nutrient | Estimated Amount |
| Calories | 300–360 kcal |
| Protein | 5–7 g |
| Carbohydrates | 28–35 g |
| Total Fat | 19–24 g |
| Saturated Fat | 8–12 g |
| Sugar | 20–27 g |
| Fiber | 2–3 g |
| Sodium | 80–150 mg |
Nutrition values are estimates and depend on the type of chocolate, peanut butter, cereal, and nuts used.
❓ Frequently Asked Questions
Can I make these chocolate bars without peanut butter?
Yes. You can use almond butter or another smooth nut butter. For a nut-free version, use a suitable seed butter and check that all other ingredients are nut-free.
Why is my chocolate topping cracking?
The chocolate may be too cold or too firm when sliced. Allow the bars to sit at room temperature for a few minutes and use a warm, dry knife.
Can I use dark chocolate instead of milk chocolate?
Absolutely. Dark chocolate creates a more intense flavor and balances the sweetness of the base.
Do these bars need to stay refrigerated?
They are best refrigerated, especially in warm weather. The chocolate topping may soften at room temperature.
Can I make these bars without crispy rice cereal?
Yes. Try crushed pretzels, chopped nuts, toasted coconut, or crisped quinoa. The texture will vary depending on your choice.
How do I get the smooth chocolate finish shown in the image?
Melt the topping gently, spread it evenly, and avoid adding too much oil. Add the chocolate pieces while the surface is still wet, then chill until firm.
Can I make them ahead for a party?
Yes. Prepare them a day or two in advance, keep them covered in the refrigerator, and slice them before serving.
✨ Final Thoughts
These No-Bake Chocolate Crunch Bars combine smooth chocolate, a crunchy nutty center, and a glossy chocolate topping into one irresistible homemade treat.
They’re simple enough for everyday cravings yet attractive enough for holiday dessert trays, parties, and family gatherings. With no oven required and plenty of room for customization, they’re a wonderful addition to your collection of easy chocolate dessert recipes.
Cut them into thick squares, serve with cold milk or coffee, and enjoy every rich, crunchy bite! 🍫🥜✨